www.acraftersheaven.com.au

Thankyou For stopping by to visit my little crafting corner. I have just started an online business www.acraftersheaven.com.au to sell my cards and I am also selling craft supplies. I love reading all your comments, and am happy to answer any questions.

You can also find me on Facebook here
https://www.facebook.com/ACraftersHeaven

Stay safe,
Tania

Wednesday, February 23, 2011

NEW ZEALAND

my thoughts and prayers are with the families of those in New Zealand who have lost loved ones and friends

I do not go to church, but believe you dont have to follow any particular religion to believe in the miracle of God. I pray that those still missing make it home safely to see their family.  Peace be with those who are resting in Gods care.

Please say a prayer with me for our fellow human beings in New Zealand

Taping off stamps


Good evening, thought I'd share how I mask off stamps to get only the image I want to stamp.


I use scotch tape.  It does not leave a residue on your stamps and is easily removed.  You can cut it easily to cover only the parts you want to and doesn't leave a sticky goo on your scissors.  Once you have covered the parts you dont want stamped, ink it up as usual, then remove the sticky tape and stamp where you want. a tip- if you have a long enough piece of tape over the edges that doesn't get inked- you can lift it off there and wont get your hands dirty
The original stamps says Daddy's little girl, but I only want the Daddy part, so I need to tape off the rest of it.

this is the finished image.  you can do this technique with any stamp- I have removed holly from christmas stamps to make an everyday stamp.  Thanks for dropping in! xox Tania xox
 

Tuesday, February 22, 2011

PENNY BLACK CARD FOR DAD

Hello! Well it has been some time since I have posted a card- I have been busy doing other stuff...and unfortunately, I have to get back to reality on thursday- that is my holidays are finished and I am back to work YUK! I could handle doing crafts every day :0) anyways, today I have done one for my hubbys birthday coming up in April.  I am going to enter this one in the Penny Black Saturday Challenge themed boys card.  Mojo Monday also has a great sketch which I am entering too. Lastly Simon Says Stamp has a Make your own embellishment challenge...not sure if the pop up in the center could be classed as an embelishment, but hand made flowers and my husband just dont go together LOL!!!! The image is of course Penny Black- "fly away" coloured a while ago just waiting for my inspiration to kick in! "Daddy" is from an inkadinkadoo set "baby girl"...the stamp was originally "Daddy's Little Girl" but I have taped the rest of the stamp- I'll show you how I do that- I'm sure there's an easier way, but this is how I do it :0) "wishes" inside is another stamp I have tapped from Stampin Up "warmest wishes". I have used martha stewart embossed zig zag edge punch. Hope you like it! Thanks for dropping by xox Tania xox

Thursday, February 17, 2011

desk top calendar

I'm loving the pinks and browns and how they work so well together. Papers used are from Rusty Pickle (sunday best); My Minds Eye (Lush pink houndstooth), shimmer Cream Bazzil and chocolate Bazzil. flowers are from wild orchid crafts and ribbon is from craft queen. small rhinestones are anitas larger ones are kaiser craft. sentiment is stampin up!. Stardust stickles. Months are hand written with white signo pen.
Wish me luck I'm off to the markets now...... I hope to sell lots of goodies!

These are some more of my desk top calendars I am doing for my market stall...my internet is VERY slow @ uploading photos, so I can only do a couple @ a time, so please bear with me. The pink dot paper is Kaiser craft "mango drops" and the blue flower paper is a Basic Grey Sugar Rush called "bottle caps". Image is from penny Johnson "Bird and Bear". The month cards are removable slide in behind the date.


Thanks for stopping by xox Tania xox

Tuesday, February 15, 2011

desk calendar

Good afternoon :0) Boy have i been busy! I am having a stall at our local markets this sunday, and have been busily making things to sell. My lastest creation are desk top calendars. this here was my first attempt. I am happy with how it turned out, but as I make more I "tweek" the recipe a little :0) I made a sliding holder for the month cards- it hides at the back. For these calendars I use 1 sheet medium thick A4 chipboard (for the frame) and one sheet thin chipboard (for the date cards). two peices of aqua bazzil and two sheets of printed paper from MME - Pretty please- "Polka Dot Orange"...I used the flip side- pretty pink flowers!! flowers and crystals from my LSS and wild orchid crafts The numbers are all hand cut-- I printed them from the computer using word art onto flat white card cut them out and used them as a template. stickles of course! ribbon from craft queen and some rhinestone bling :0) Image is penny black's "Buzz in the air".

Thanks for dropping by xox Tania xox

tutorial embossing shims designed by me!!! avail on ebay

Hi Guys, this evening I thought I'd show you my embossing shims I sell on ebay. I have spent hours perfectly these- getting the right recipe - thickness, shape etc. Below is a picture of embossing with a cuttlebug folder as I normally would- I have a sizzix so I will go through how I do it......
this is the result: the bottom embossing was my normal embossing, the top one is with the rubber shim!!! you can put these thin shims (1,2 or 3 all together) and emboss a portion of an A5 folder down the side or middle so you can stamp on the other side


Set up your folder as normal with paper inside. Place rubber shim over the folder- making sure shim is central and not touching sides. Set up your machine as you would if you were embossing as usual.

Sunday, February 13, 2011

belles and whistles gingerbread love


good afternoon. Today I have done a card with a gorgeous image from Belles n Whistles. I have "altered" it A LITTLE!!!. It is called "gingerbread Love"....minus the gingerbreads for Valentines day :0) Hope you like it. I am going to enter this one in the February's Belles n Whistles challenge "Alter It". Scrapbooking allsorts is where I bought this partticular stamp which is Australian based supplier. I have also bought these gorgeous stamps from the Belles n Whistles store - their international shipping is also reasonably priced which helps too :0) the ribbon is from craft queen and the flowers are fromm my LSS and wild orchid crafts. The red embossed card is SOOOOO old- just some off cuts that I've kept (I have boxes of off cuts- you just never know when you'll need them LOL!!) The rhinestone swirl- I peirce the holes as a guide, then indiviually glue anita's 2mm rhinestones on- takes a long time, but boy the result is worth the effort and much cheaper than buying them pre made!- you can do this yourself by drawing swirls onto acetate with a permanent marker (I use slick markers) then with a large needle/pin punch holes through the acetate evenly spaced, and viola! this is your template- use a fine tip pen to mark through each pin hole and then dot glue over the marks and adhere the rhinestone..easy a pie! inside hearts cut with spellbinder.


Prisma colours: light peach, peach, peach nectar, rosy beige, blush pink, pink, mediterranean blue, denim blue, blue slate, true blue, jasmine, light umber, dark umber, scarlet red, carmine red, and marine green. Derwent pencil: copper beech.
thanks for dropping by xox Tania xox


Saturday, February 12, 2011

Tutorial boxes


Good morning :0) I thought I'd share with you an easy box recipe that I use to make ALL my boxes.  you can adjust the size/height to what ever you desire (within the 30.5cm that is the cardstock).  We work metric here in Australia, but will convert to the closest imperail measurement.  Ok, so when I do boxes for my cards, I measure the card I've made and add 5mm / 1/4" (this is fo the card is not tight in the box). Thats the base measurement! then you can either make the box 2cm (metric) or 1" (imperial) deep (I do these measurements because it is easier when using the scorpal as there is not a 2.5cm grove on the metric scorpal).  YOU NEED TO DOUBLE THE HEIGHT AS THIS FOLDS OVER ON ITSELF, THEN MULTIPLY THIS BY 2 (2 sides of the box).  Ok, so you have the basic measurement equation- I normally make my cards 14.5cm square- so here I would add 0.5cm to the base MAKING 15cm / 5 7/8". I do my boxes 2.5cm (1") (REMEMBER TO MULTIPLY BY 4) high- so I would add 10cm / 3 15/16" to the overall dimension.  that means what I end up with is a peice of card stock cut @ 25cm / 9 7/8"  IT REALLY DOESNT MATTER IF SIZES ARE A LITTLE OUT, AS LONG AS YOUR SCORLINES ARE INCREMENTED EVENLY  Use exactly the same technique for the lid of the box....but add a further 4mm or 1/8" to the total size so the lid sits loosely.... still scoring at the same measurements you have done for the box. for deep gift boxes I normally do a lid with a smaller lip therefore I would only add 3cm to each side and score @ 1.5cm and 3cm- adjusting the overall size accordingly.
Now you have scored around your cardstock @ 2.5cm and 5cm OR 1" and 2" all the way around, you now need to start cutting.  the picture probably represents better than I can explain- I will work in squares across.......in the third square start 1cm or just over 1/4 " in, cut at an angle down to the first scorline intersection.  from that point, cut along that scorline to the next intersection.
cut along the scorline and remove the first two squares as well as the angle
Repeat for other side


turn card around and do exactly the same on the opposite end
take the square side fold at the scorline and stick the two square wings down (ie NOT the side with the angles cut out)

holding the box in position, lift that flap up and over the wing bits.  press down, and repeat for the other side
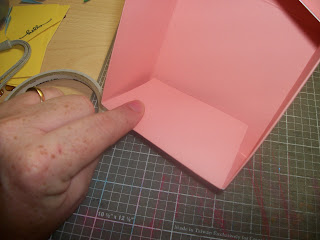
you will end up looking like this
so the ends fold nicely trim some angles into the edges of the square flaps- I've marked them to show you, but you dont need to mark them, just cut them out- again, don't be too precise here- you are not going to see your cuts, it just helps them fold nicely into the box
do this for all four square flaps.  Now, crease all your scorlines up including the little flaps you have just cut.  ok, so looking at the picture, glue or adhesive tape the first section of the two outer wings (of the middle section)


you end up with a box like this. hope this makes sense- if you any help please just ask :0) thanks for dropping by  xox Tania xox


gift box- simon says anything but a card


hi everyone. thought I might pop this one in for the simon says stamp challenge I make boxes for my cards, and thought I would make a smaller but taller version. They are really easy to do and I will upload instructions tomorrow. this size box is 10cm x 10cm x 5cm tall. I have raised the image- Penny Black's "yearning" on foam and 'hello" is from the stampendous clear "flower chat" set. I have used ribbons/ flowers I have had for years, you should be able to get them from any scrapbooking shop. the centre of the yello flower I have stuck yellow micro beads using stickles, you can see the glossy accents on the watering can as well as silver stickles on the spout/ straps. green sparkly fluff for the grass.


prisma colours: dark brown, french grey 70%, cool grey 90%, putty beige, peach, pink, kelly green and metallic silver. Derwent pencil: copper beech

hope you like :0) thanks for dropping in xox Tania xox

Friday, February 11, 2011

LOTV Dawny P sketch challenge


Good morning. I have done this card for LOTV sketch challenge provided by Dawny P. I have used "hello cupcake". Papers are from the Magic happens collection from kaiser craft. the butterfly edge is martha stewart pop up butterflies. I have added rhinestones to the centres. butterfly embossing is done using a crafts too folder available from crop stop here. Ribbon is way too old to remember where I got it from. On the hat I have used sparkly Fluff in "brown sugar". the flower has "raspberry fizz" ultra fine flower soft added to it. Stickles and dimension magic of course!!! sentiment computer generated using "kunstler script" font size 20. flowers are from my LSS and wild orchid crafts. I got the chandelier's from WOC too.


Prisma colours: light peach, peach, nectar, blush pink, pink, mineral orange, yellowed orange, jasmine, crimson red, greyed lavendar, parma violet, violet, dahlia purple, aquamarine, and blue slate.
Derwent pencil: copper Beech
signo ink marker (broad) for the white polka dots on dress and socks
Thanks for stopping by xox Tania xox

Thursday, February 10, 2011

Never too early for a Christmas Card...Right???


It's never too early for Christmas cards...is it???? I bought this stampendous stamp from Sue @ heartprints. She still has some of her pre loved stamps for sale click here to view them. Aren't they just the cutest??? "Angel Kisses" from their 2008 range.  The sentiment is a sweet 'n sassay one from #1065 "A True Friend"...fitting, given the image and that I am putting this one in their sketch challenge. I LOVE blue and silver @ Christmas...the dotted paper is from the DoCrafts papermania "Perfect Summer Days" set, and the snowflake is "let it snow" from sandylion.  Ribbon is from my collection bought somewhere back in time :0) as is the charm of an angel praying. Pearls are KaiserCraft.  I have inked the edges with a dauber using stazon azure.

Prisma colours: Light peach, peach, pink, beige, rosy beige, jasmine, goldenrod, light umber, dark brown, muted turquiose, blue slate, pale sage, kelly green, magenta.  I also used a pencil from my childhood!!! goes to show how long a good quality pencil will last...now this one was given to me in grade 3 from my Nana 1985!!!! still has what it takes..... Derwent studio- copper beech :0) stickles added to wings and blanket. 
Inside "merry christmas" is from papermania DoCrafts.  I hope you enjoyed looking at this card 
Thanks for dropping by xox Tania xox

Wednesday, February 9, 2011

word verification

YAY!!! I FOUND OUT HOW TO DISABLE THE WORD VERIFICATION! Who thought that you could learn so much blogging LOL???

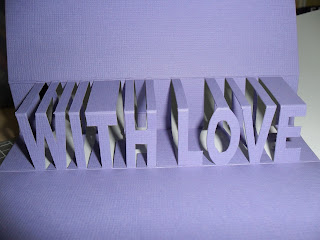
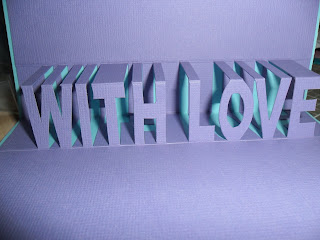
tutorial for popup greetings


to get the size of the insert, take away 10mm from the width of the card, and 40- 60mm from the height of your card (if you want the entire inside of the card covered with this peice, take 10mm off length). the insert needs to be a strong cardstock like Bazzil, printed paper will not hold its shape
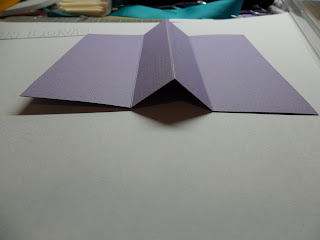
using your scoring tool, fold card in half
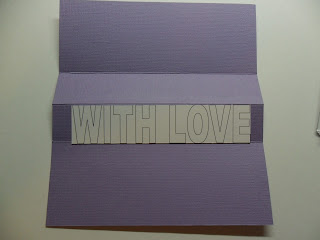
Place the word as a template (from your computer) on the bottom of scor line and scor along the bottom of the word and move template above the center scor line and scor along the top of the word. Ok to get the words, you need to open new word document, drop down on the insert tab to picture then to word art select the style - the first box which is just square and block letters. I do mine to in ariel black size 60. If you are doing a longer word, the size will have to be smaller to fit your card. Remember, try to do a word with as little rounded letters (eg O, G, U, R) as possible ( they are hard and take too much time)
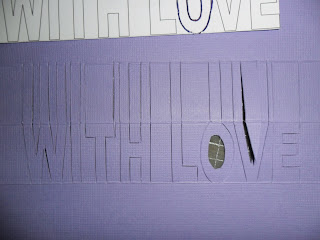
The wording needs to sit in the bottom portion of the scored section as in the photo above when pricking/ cutting.

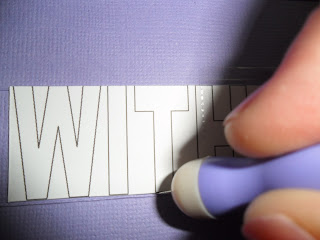
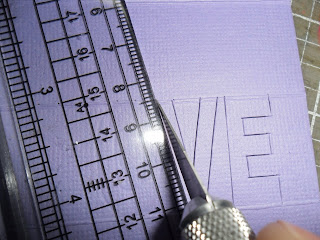
using a punch needle (or a pin will do if you dont have one) prick @ every point of the letter- this serves as a cutting guide, where you will go back to your childhood and do dot to dot LOL!!! I find if I attach the template with scotch tape (as it wont tear your cardstock when removed) it stops the template from moving


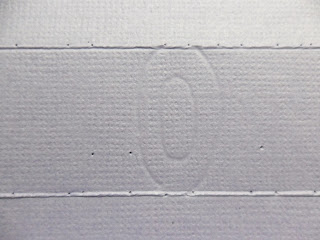
for the rounded letters, I just went over the "o" (on the template) with a ball point pen hard enough to indent a guide. Now play dot to dot.

ONLY CUT UP TO THE SCOR LINES AND DO NOT CUT ALONG THE SCOR LINES

LEAVE THE LETTER ATTACHED TO THE INSERT
when cutting, it is important that you do NOT cut along the scor lines- these serve as the "holders" for your wording (note the top of the "E" is not cut)

@ the top of the letters ONLY cut vertical lines to the farthest top scor line...do not cut these off- they serve as the shadowing and provide stability for your pop up letters

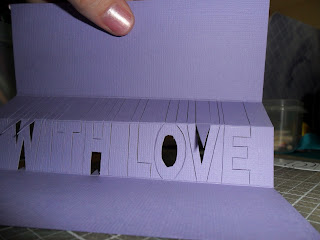
holding your card how it will sit in your card, push through the excess card, leaving only your greeting sitting out


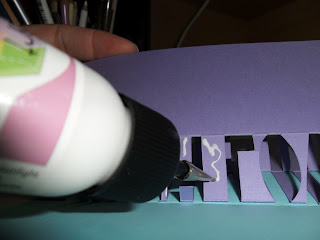
folding your lettering in half, with the letters inside and the tags outside, you need to add glue to the tags, one side at a time and adhere in the centre of your card...much easier and less messier done one side @ a time- you are not adhering the flaps @ this time as the tags will shift and adjust when the card is in the closed position

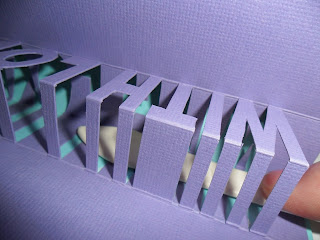
here I use my scoring tool (or palet knife) to go through the centre and push down on the tags to make sure they are stuck well enough


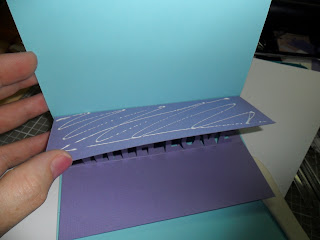
once the tags are glued and you have closed and opened the card a few times, you can now glue the flaps

I do hope this make sense and is easy to follow, once you do your first one or two, it all comes together and starts to make sense :0) Thanks for stopping by xox Tania xox